


Click on Sign in. Enter your "Email" and "Password". On successful log in, you will see your dashboard with your courses. If you are not registered yet, please follow the instructions to register.
For every course that has lab a "Connect" link will be open. Courses with no lab will have strike out connect link. You can see both of these examples in the screen shot below.

Click on Connect. You will get a pop-up box with instructions. See the screen shot below :


Carefully read the instructions. "Note your password" and Click OK.
If this is your first time connecting to lab, a new instance (server) on amazon cloud will be created for you.
Creating a machine will take few minutes. Be patient. Wait for the message that a Lab is ready to use. For second time onwards, same instance will be started for you. A typical wait is for 2-3 minutes for second time onwards.
Depending on your browser type, you will have a different prompt to open or save your connection setup file. See the screen shot below :

This is a remote desktop connection file with dot RDP extension. Remote desktop is installed by default on windows machine. For Linux and Mac machines, you willl need to install it on your desktop/laptop. Click on drop down box of "Save" and choose "Save as". A dialog box will appear for you to choose a location and filename. Note the file name and location, you will need it later. See the screen shot below :

Save your file, the dialog box will close. Browser will give you option to open the folder(depending on the browser). Click on "open folder". Double click on your saved RDP file. See the screen shot below :

You will get the following RDP prompt.

Click on "Connect". A prompt will appear to enter your password.

Enter the password that you noted earlier. Another prompt box will appear. See the screen shot below :
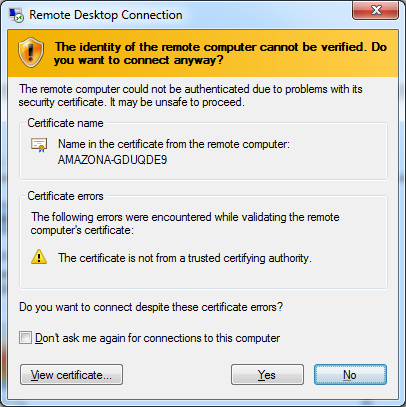
Click Yes. A RDP window will open and you are connected to the server. Below is a screen shot of windows server desktop. A Linux desktop will look different.

Now you can follow your lab exercise guide.
0 Comments